Essentially, your core is the engine of your whole body.
It’s not just about abs. Your core runs from your lower back to where your hips meet, includes not only your obliques but also the deep muscles that hold your spine upright. With a weak core, everything is affected — your posture and balance, athletic performance, even lower back health.
The majority of people are aware that they must strengthen their core. But most people are doing it wrong too.
They do crunches until their neck aches. They hold planks with descending hips. They do sit-ups that put pressure on their spine rather than strengthen their midsection. And unable to see how they are going wrong, they repeat the same mistakes — and keep getting the same lackluster results.
And that is precisely where AR fitness core training makes a difference.
Augmented reality brings a virtual coach into your space. It observes your motion through your camera. It projects real-time cues onto your body. It tells you when your hips drop, when your breathing is off, and when you’ve nailed a perfect rep. You’re not guessing anymore — now you’re actually training.
In this article, we discuss the 4 essential AR fitness core moves everyone should master. Each is fully explained — how to do it, why it works, what AR contributes to the mix, and how to make it more challenging as you get fit. Whether you’re completely new to core exercises or aiming to dial in your form, this guide has all the essentials.
Let’s build that foundation.
Why Your Core Is More Important Than You Realize
Before we get into the moves, let’s take a minute to talk about what the core actually does.
Many people think that the core consists only of the six-pack muscles — the rectus abdominis. That’s only part of the picture, however. Your core is a complete cylinder of muscle surrounding your midsection like the most functional weightlifting belt.
Here’s what’s included:
| Muscle Group | Location | Main Function |
|---|---|---|
| Rectus Abdominis | Front of abdomen | Flexes the spine (crunching motion) |
| Transverse Abdominis | Deep layer of abdomen | Stabilizes spine and pelvis |
| Obliques (Internal/External) | Sides of torso | Rotation and side bending |
| Erector Spinae | Along the spine | Keeps your back straight |
| Multifidus | Deep spine muscles | Aligns vertebrae |
| Glutes and Hip Flexors | Hips and pelvis | Connects lower body to core |
When all these muscles collaborate, you move efficiently, absorb force safely, and protect your spine.
When they don’t — because they’re weak, unbalanced, or being trained improperly — things begin to go awry. You get lower back pain. Your posture collapses. Other lifts and athletic movements become less efficient.
AR fitness core training engages your entire midsection. It will not only improve how your abs look. It makes everything in your body work better.
Why AR Makes Core Training More Efficient
Traditional core exercise requires you to have a sense of what good form is — and how it feels when you’re achieving it. That’s harder than it sounds. Core muscles are deep and subtle. It is really hard to know if you are engaging your transverse abdominis or tilting your pelvis without external feedback.
AR changes this completely.
Pose-detection technology used through your phone or AR headset analyzes your body position in real time. It monitors joint angles, tracks the alignment of the spine, and flags when something seems off.
What Real-Time AR Core Feedback Looks Like
- A skeletal overlay reveals your spine position during a plank
- Joint markers change color to red when the hips drop
- Audio cues let you know when to breathe out on the effort phase
- Rep scores show you how cleanly you completed each movement
- A ghost image of correct form glows next to your body so you can mirror it
It used to be that you needed an in-person coach watching your every move for this level of feedback. Now it lives in your pocket.
The result? You learn faster. You stop reinforcing bad habits. And you get more from each individual rep.
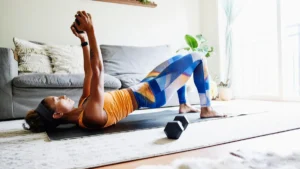
Move 1: The Dead Bug — The Most Underrated Core Exercise on Earth
If there’s one exercise that physical therapists, strength coaches, and sports scientists can all agree is about as close to perfect as you’ll find, it’s the dead bug.
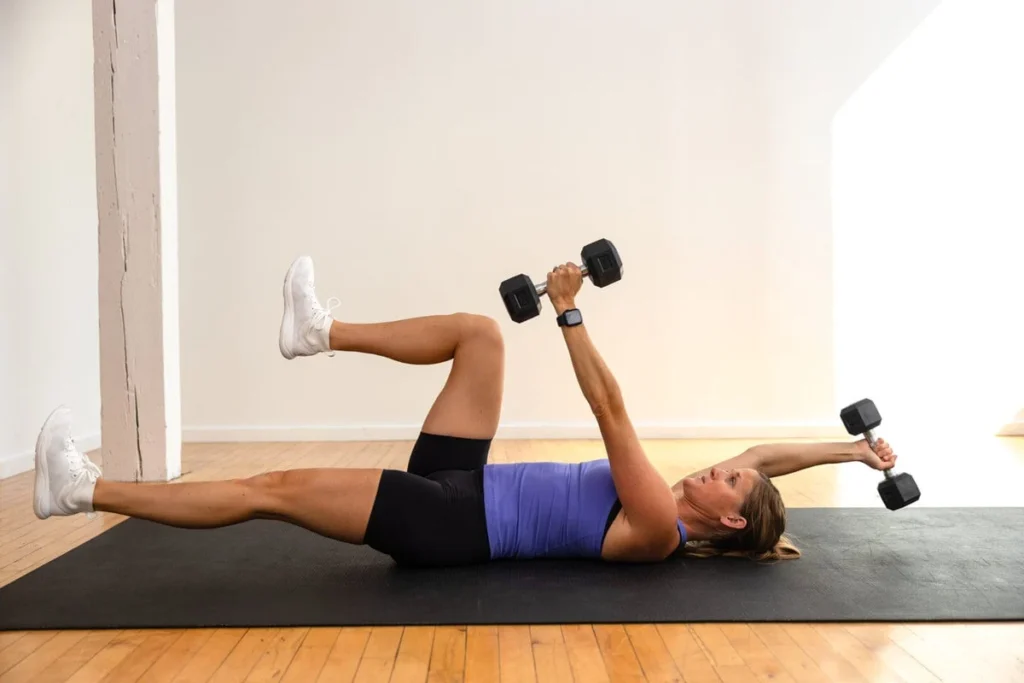
It sounds ridiculous. It looks strange. But it’s one of the most effective ways to build deep core stability without placing any load on your spine.
Why the Dead Bug Is So Effective
The dead bug trains what is referred to as anti-extension. That means it trains your core to counter the force that wants to arch your lower back. This is one of the major functions your core performs in real life — when you’re picking up a bag of groceries, running, or sitting at a desk for eight hours.
The dead bug, unlike crunches, maintains a neutral spine throughout. This keeps your back safe while still working your core as intensely as possible.
How to Do the Dead Bug (Step by Step)
- Lie flat on your back on a mat
- Press the small of your back firmly into the floor — this is your starting position
- Lift both arms straight up toward the ceiling
- Lift your legs until your knees are above your hips, bent to 90 degrees
- Simultaneously lower your right arm and left leg toward the floor
- Stop just above the ground
- Return them to the starting position
- Repeat on the other side — left arm, right leg
- That’s one full rep
The essential point throughout all of this is keeping your lower back pressed into the floor. The minute it lifts off the ground, your core has lost tension. That is the part where AR feedback becomes extremely useful.
What AR Adds to the Dead Bug
| Without AR | With AR |
|---|---|
| Can’t tell if lower back is lifting | Spine overlay shows exact position |
| Hard to tell if limbs are fully extended | Joint tracking confirms range of motion |
| No way to count clean vs sloppy reps | Rep scoring separates quality from quantity |
| Easy to hold breath without noticing | Audio cues prompt correct breathing rhythm |
Dead Bug Progressions
Beginner: Lower only one limb at a time (arm only, then leg only) before combining them
Intermediate: Add a 2-second pause at the bottom of every rep
Advanced: Hold a light dumbbell in each hand for added anti-extension demand
Move 2: The Plank — Done Right, It’s a Whole Different Exercise
Most people have done a plank. Almost everybody has done it wrong.
The plank is one of the most popular AR fitness core moves for a reason — when performed correctly, it trains the full cylinder of your entire core simultaneously. It builds stamina, stability, and the capacity to maintain a rigid torso under pressure.
But “holding a plank” for two minutes with sagging hips and a raised backside isn’t the same as correctly doing a plank for 20 seconds. AR makes that difference impossible to miss.
The Real Goal of a Plank
It isn’t about surviving as long as possible. The idea is to generate maximum tension throughout the whole body — legs tightened, glutes clenched, abs braced, arms pushing into the ground — and hold that tension for a specified amount of time.
View it as a full-body contraction, not a break for your arms.
How to Do a Flawless Plank (Step by Step)
- Begin lying face down on a mat with your forearms on the floor, elbows right under your shoulders
- Raise your hips so that your body creates a straight line from your head to your heels
- Squeeze your glutes hard
- Draw your navel slightly toward your spine
- Press your forearms into the floor as if you’re trying to pull them apart
- Maintain a neutral neck — eyes gazing at the ground just in front of your hands
- Breathe steadily throughout
- Hold for the target time and then lower down with control
That straight line from head to heels is everything. AR overlays make the line visible in real time.
Common Plank Mistakes AR Catches Immediately
| Mistake | Why It’s a Problem | How AR Flags It |
|---|---|---|
| Hips too high | Reduces core engagement | Spine angle overlay turns yellow/red |
| Hips sagging | Strains the lower back | Hip position alert activates |
| Head dropping or lifting | Creates neck tension | Head alignment marker flags the issue |
| Holding breath | Reduces stability and focus | Breathing prompt appears on screen |
| Elbows too far forward | Shifts load off the core | Joint position cue corrects placement |
Plank Progressions
Beginner: Hold for 15–20 seconds with perfect form, rest, repeat 3 times
Intermediate: Straight-arm plank (on hands instead of forearms) to increase shoulder demand
Advanced: Plank with alternating leg lifts — one leg lifts 6 inches while the rest of the body stays completely still
Move 3: The Pallof Press — The Core Move That No One Talks About Enough
Most people have never heard of the Pallof press. Which is a shame, because it may be the single most functional core exercise that exists.
Planks and dead bugs train your core to resist extension, while the Pallof press trains it to resist rotation. This is called anti-rotation — and it’s a function your core performs constantly in everyday life and in sport.
Every time you carry a bag on one shoulder, swing a golf club, throw a punch, or change direction while running, your core is resisting rotational forces. Training this quality directly makes you stronger and more resilient to injury.
According to the National Academy of Sports Medicine, anti-rotation core training is one of the most effective ways to build functional strength and reduce the risk of lower back injury in both everyday movement and athletic performance.
How to Perform the Pallof Press (Step by Step)
The traditional version is done with a resistance band or cable machine. At home, a resistance band anchored to a door frame or table leg works really well.
- Anchor a resistance band at chest height to your left side
- Stand sideways to the anchor point, feet shoulder-width apart
- Hold the band with both hands at your chest
- There will already be tension in the band trying to rotate your torso toward the anchor
- Brace your core to resist this pull
- Press both hands straight out in front of your chest
- Hold for 2 seconds — keep resisting that rotational pull
- Bring your hands back to your chest
- That’s one rep. Complete a full set, then switch sides
Why AR Feedback Is Like Gold Here
The Pallof press is subtle. The movement is small. It’s very easy to cheat by slightly rotating your shoulders, shifting your hips, or holding your breath as a counterbalance. None of these cheats are visible to the naked eye.
AR pose detection captures all of them.
| What AR Tracks During Pallof Press | Why It Matters |
|---|---|
| Shoulder alignment | Flags if you’re rotating to compensate |
| Hip position | Detects weight shifting |
| Elbow and wrist angle | Confirms arms are fully extended |
| Torso stability score | Measures how well you resisted rotation |
Pallof Press Progressions
Beginner: Shorten the distance from the anchor to reduce band tension
Intermediate: Hold for 3 seconds at full extension before returning
Advanced: Perform the press in a split stance (one foot forward) for more balance challenge
Move 4: The Glute Bridge — Your Core’s Best Friend Below the Belt
Here’s something that surprises many people: your glutes are a core muscle.
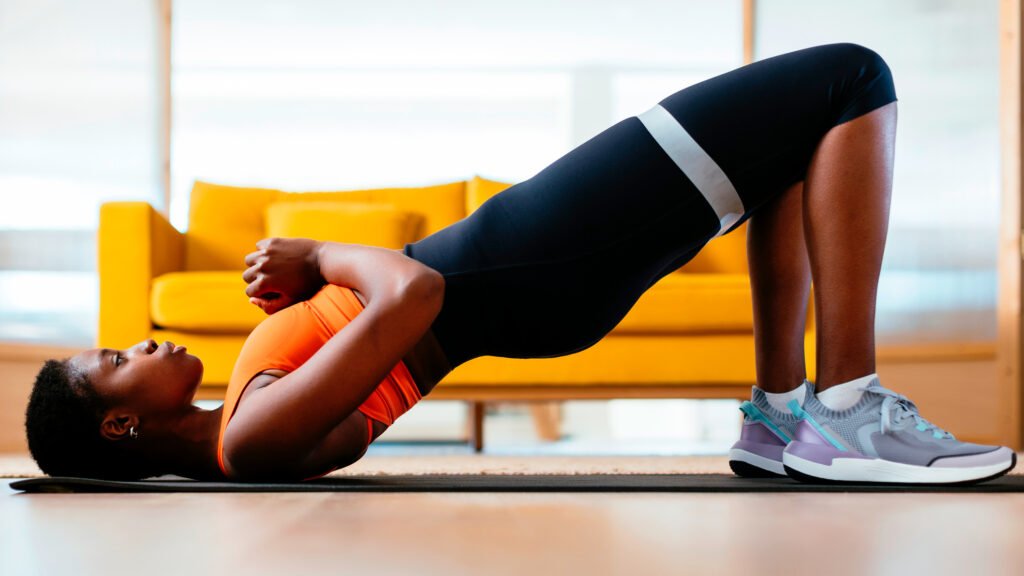
The glute bridge is one of the key AR fitness core moves because it trains the posterior chain — the backside of your body — which interacts directly with your deep core to support your spine and power your movement.
Weak glutes are a leading cause of lower back pain, poor posture, and compromised athletic performance. Strengthening them enhances core function across the board.
For more detailed guidance on recovery, body mechanics, and training strategies to support your core work, visit AR Body Health — a great resource for anyone serious about training smarter and staying injury-free.
How to Do a Perfect Glute Bridge (Step by Step)
- Lie on your back with knees bent and feet flat on the floor, hip-width apart
- Arms rest by your sides, palms flat on the floor
- Press your feet into the floor and squeeze your glutes to lift your hips
- Rise until your body forms a straight line from shoulders to knees
- Squeeze hard at the top — don’t rush through it
- Hold for 2 seconds
- Lower slowly back to the floor
- That’s one rep
The top of the movement is where the work gets done. AR feedback ensures that you’re actually achieving full hip extension, not just coming close.
Full AR Core Training Week
| Day | Move | Sets x Reps | AR Feature Used |
|---|---|---|---|
| Monday | Dead Bug | 3 × 10 reps each side | Spine position overlay |
| Tuesday | Plank | 3 × 20–30 sec holds | Alignment scoring |
| Wednesday | Rest or light walk | — | Step tracking optional |
| Thursday | Pallof Press | 3 × 10 reps each side | Rotation resistance score |
| Friday | Glute Bridge | 3 × 15 reps | Hip extension tracker |
| Saturday | Full core circuit (all 4 moves) | 2 rounds | Full AR session with rep scoring |
| Sunday | Full rest | — | — |
Glute Bridge Progressions
Beginner: Hold each rep at the top for just 1 second before lowering
Intermediate: Single-leg glute bridge — straighten one leg while driving the movement with the foot of the other
Advanced: Place a resistance band just above the knees to increase glute activation and work on abduction simultaneously
Bringing It All Together — Your AR Core Training System
These 4 essential AR fitness core moves target every major function of the core:
| Move | Core Function Trained |
|---|---|
| Dead Bug | Anti-extension, deep stability |
| Plank | Full-body tension, endurance |
| Pallof Press | Anti-rotation, functional strength |
| Glute Bridge | Posterior chain, hip stability |
Combined, they build a core that not only looks strong but also performs strong. And with AR coaching delivering real-time feedback on every rep, you develop correct movement patterns from day one.
No more guessing. No more reinforcing bad habits. Simply clean, efficient, progressive core training.
How to Track Your Core Progress With AR
The data collected by AR fitness tools is one of the most significant benefits for core training. Over time, you will begin to see real improvements that go beyond just how you look in the mirror.
Metrics to Watch as You Progress
- Rep quality score — Are your reps getting cleaner over time?
- Hold time without form breakdown — Are your planks lasting longer under full tension?
- Resistance level in Pallof Press — Can you use a heavier band?
- Range of motion in Dead Bug — Are your limbs getting closer to the floor before the back lifts?
- Single-leg bridge hold time — Is your hip stability improving?
Set a baseline in week one. Review your data every two weeks. Modify your progressions according to what the numbers actually tell you.
FAQs About AR Fitness Core Moves
What are the 4 essential AR fitness core moves covered in this article? The four moves are the Dead Bug, the Plank, the Pallof Press, and the Glute Bridge. Collectively, they train all the major functions of the core — stability, endurance, anti-rotation, and posterior chain strength.
Do I need AR equipment to perform these core moves? No. None of the four moves require any AR equipment whatsoever. But working with an AR fitness app that features pose detection — like Kemtai or Kaia Health — greatly enhances how quickly you learn proper form and how effective your progress is.
How often should I do these AR core moves? 3 to 4 sessions per week hitting these moves is ideal for most people. The core requires time to rest and rebuild on the days between workouts. A sample weekly schedule is included in this article as a practical framework to follow.
Can beginners do all 4 of these core moves? Yes. For each movement, there’s a beginner version that retains the basic movement pattern but lessens the intensity. Begin with the easier progressions and move on from there as your strength and technique improve.
How long before I see results from AR core training? With regular practice, most people will notice improvements in posture and reductions in lower back discomfort typically within 2 to 4 weeks. Visible improvements to muscle strength themselves typically become apparent after roughly 6 to 8 weeks.
Is the Pallof press safe for people with lower back pain? The Pallof press is, in fact, one of the most spine-friendly core exercises available, since it doesn’t involve spinal flexion or extension. But if you already have a back injury, always consult a physical therapist or doctor before starting any new exercise program.
What AR apps work best for core training? For real-time pose detection specifically for core exercises, Kemtai, Kaia Health, and Tempo are excellent choices. For headset-based training, Supernatural and FitXR offer guided core circuits. The right choice depends on your equipment and budget.
Can these core moves also help with athletic performance, not just daily living? Absolutely. All four train the core functions most relevant to sport — stability under load, resistance to rotation, and hip power generation. Athletes in every discipline from running to martial arts to team sports benefit from this type of foundational core work.
The Bottom Line
A strong core is not just nice to have. It’s the base upon which everything else in your fitness life is built.
The AR fitness core moves this guide revolves around — the Dead Bug, the Plank, the Pallof Press, and the Glute Bridge — form a complete system. They train the core in every capacity it must serve. And when you add AR feedback to your workouts, you eliminate wasted reps and actually build real strength.
The technology that once required a top-tier coaching facility is now sitting in your pocket or on your wrist. Use it.
Start with the beginner versions. Focus on form before intensity. Use the AR data to guide your progressions. And show up consistently — because consistency is what transforms a good training plan into real, lasting results.
Your core is waiting. Time to build it right.