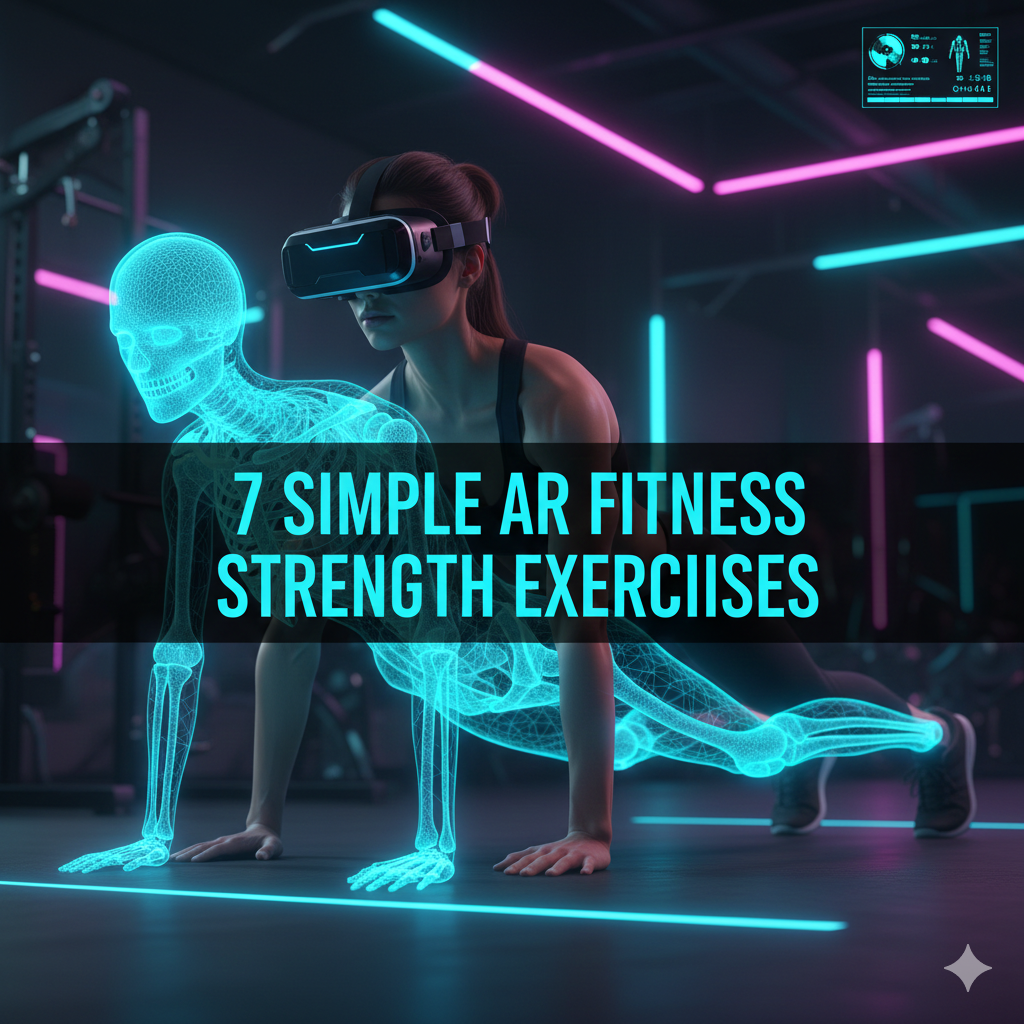
What if your workout had a voice, and it talked back to you?
Not in a creepy way — but in a way that reminds you when your form is wrong, tells you exactly how low to squat and motivates you when you want to give up. That is precisely what AR fitness strength moves has to offer.
AR is no longer just the stuff of sci-fi movies or gaming setups. It’s now sitting inside your cell phone, your fitness apps and in some instances, your glasses. And it’s making strength training smarter, more personal and a lot more fun than gazing at yourself in the mirror of your gym.
Whether you’re new to exercise or have been lifting for years, these seven AR fitness strength moves can elevate your workouts in ways that traditional weight training cannot touch. No fancy equipment needed. No personal trainer required. Just you, your phone and an entirely new way of moving.
So let’s dive into each and every one.
The Tech Behind Efficient Weightlifting: AR and Strength Training
Before we dive straight into the moves themselves, it’s helpful to know why AR works so well for strength training specifically.
It is always all about precision while doing a heavy workout. The angle of your knee matters in a lunge. Your spine position also matters when performing a deadlift. How deep you squat matters. Get these wrong with enough frequency, and you’re not just expending effort — you’re establishing bad habits and increasing your injury risk.
Traditional workouts offer no real-time feedback unless you’re under the watch of a coach. The vast majority of people simply cannot afford that luxury.
AR addresses this issue by serving as a personal trainer that overlays instructions on your surrounding environment. The app can track your body using your phone camera, project form guides onto your screen and give you immediate corrections as you move.
That combination — precise feedback and immersive engagement — is what makes AR fitness strength moves so effective. If you want to learn more about how AR is changing health and fitness, visit AR Body Health for a wealth of resources on the topic.
Move 1: The AR-Guided Squat
The King of All Strength Moves, Made Smarter
The squat is one of the most efficient lower-body exercises ever developed. It works your quads, hamstrings, glutes and core simultaneously. But it is also one of the most easily done wrong.
Knees caving inward. Back rounding. Not going deep enough. These are mistakes that hinder your progress and can damage your knees over time.
AR fitness strength moves make the squat a whole new experience. AR apps like Kaia Health and Future use the camera on your phone to project alignment guides onto your body in real time. You see a virtual line showing the proper track for your knees, how low to descend and whether your back is remaining neutral.
How to Do It With AR
- Position your phone on a stable surface that is facing you — waist high to head level is best.
- Launch your AR fitness app and start your squat.
- Stand in camera view with feet shoulder-width apart.
- Lower your body to the ground as you follow the AR overlay guides.
- The app flags any form issues immediately — fix and go on.
Perform three sets of 10 reps to start. Be more concerned with the feedback than the number of reps in the beginning.
Why It Is Better Than a Regular Squat
| Feature | Regular Squat | AR-Guided Squat |
|---|---|---|
| Feedback | None if not coached | Real-time visual overlay |
| Depth assessment | Self-assessed | App-measured |
| Injury risk | Higher for beginners | Significantly reduced |
| Engagement | Low | High |
| Progress tracking | Manual or none | Automatic |
Move 2: The AR Resistance Band Press
Old-School Tool, Next-Level Technology
Resistance bands have a long history spanning decades. They’re inexpensive, portable and exceptionally effective for developing upper-body strength. Add AR to the mix, and they become something else entirely.
AR fitness strength exercises using resistance bands function by monitoring your arm position as well as your movement path on pressing motions. Apps superimpose a virtual guide that shows the proper arc for pressing — and alerts you when your elbows flare out too widely or your wrists bend the wrong way.
Why Resistance Bands Plus AR Work So Well Together
Resistance bands generate something known as variable resistance — the tension becomes greater as you pull the band further. In many cases, this fits your muscle’s natural strength curve better than dumbbells do.
Paired with AR form correction, you have a press exercise that taxes your chest, shoulders and triceps efficiently while protecting your joints.
The Move
- Attach a resistance band behind you at chest height.
- Hold both ends with palms facing down.
- Place your phone camera off to the side so that the app can see your arm movement.
- Press forward and upward, tracking the AR motion guide onscreen.
- Return to the starting position in a slow, controlled manner.
Do three sets of 12 reps. The AR overlay will notify you whether you’re getting off the ideal press track.
Move 3: AR Plank With Immediate Core Feedback
The Plank Has Never Been This Precise
The plank is a mainstay of every strength regimen. When done correctly, it builds core stability, strengthens your lower back and even engages your shoulders and glutes. But most people either hold it incorrectly or don’t hold it long enough to get any real benefit.
This is one of the most underrated AR fitness strength moves for a pretty simple reason — the plank is all about body position, and AR is really great at tracking body position.
What AR Adds to the Plank
When you do a plank with an AR app tracking you, the app can detect whether your hips are too high or sagging too low. It can track the straightness of your spine. Some apps even measure the slight trembling in your muscles that indicates your core is operating at full capacity — and tell you exactly when to rest.
Apps like Freeletics and Nike Training Club have started adding AR overlays specifically for this kind of body position drill.
How to Set It Up
- Stand your phone on the floor angled upward or lean it against a wall, facing you from the side.
- Assume a forearm plank position.
- Let the AR app check your alignment.
- For beginners, hold for 30 seconds and work up to 60 seconds or longer as you improve.
- The app alerts in real time when your form wanders — adjust without losing the hold.
Just five minutes of properly executed AR-guided planking per day can lead to visible core strength after two to three weeks.
Move 4: The AR Deadlift Form Trainer
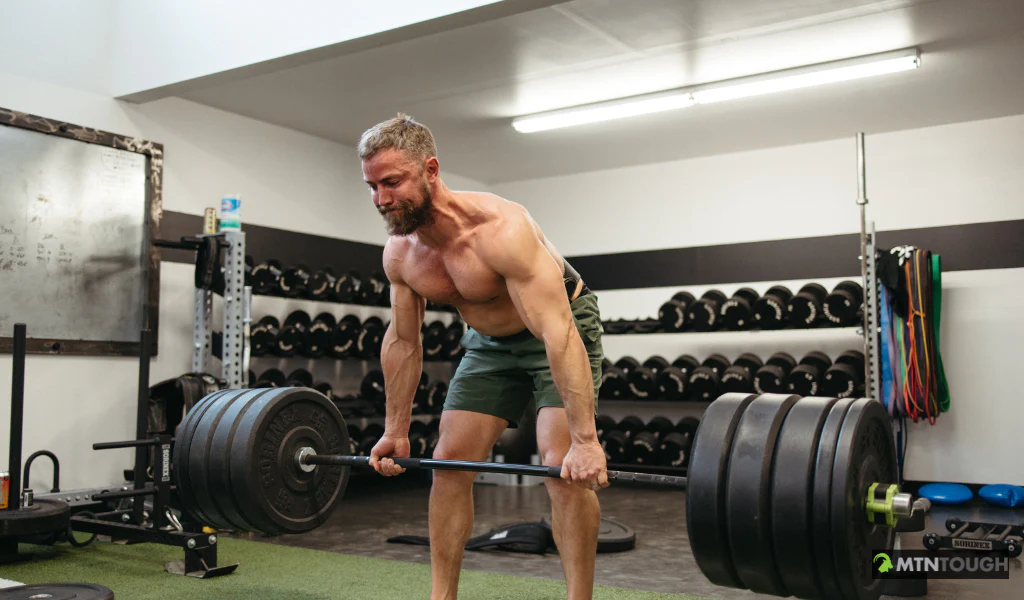
The Most Critical Lift You May Be Doing Wrong
When it comes to building strength, the deadlift is hard to beat. It works your hamstrings, glutes and lower back, as well as traps and forearms within one single movement. It is also one of the lifts that has the biggest reputation for injury when performed sloppily.
The good news is that AR fitness strength moves have made learning the deadlift safer and easier than ever.
The Deadlift Mistakes AR Can Catch
- The lower back rounding at the start of the pull
- Allowing the bar to drift away from the body
- Knees locking before full hip extension
- Looking up too sharply, straining the neck
An AR deadlift trainer places a virtual spine guide next to you as you hinge. It tells you right in the moment, with color coding, if your back is neutral, slightly rounded or dangerously curved.
AR Deadlift Breakdown
| Phase | What AR Tracks |
|---|---|
| Setup (feet position) | Hip-width stance alignment |
| Hinge (hip push back) | Spine angle and neutral back |
| Pull (bar off ground) | Bar path proximity to legs |
| Lockout (standing tall) | Hip extension and knee timing |
| Descent (lowering bar) | Controlled spine position |
Begin with bodyweight or extremely light resistance. Let the AR system train your movement pattern before you add load. That’s how the best lifters in the world were taught — with feedback on every repetition.
Move 5: AR Lunge Walk With Knee Tracking
Build Leg Strength Without Destroying Your Knees
The walking lunge is a great exercise for building strength in your total lower body. But it can put a lot of pressure on the knee joint if your front foot lands at an improper angle, or if your knee caves inward.
AR fitness strength moves transform the walking lunge into a guided, tracked experience that helps keep your knees healthy while building some serious strength.
How AR Knee Tracking Works in a Lunge
Your phone’s camera measures the angle of your knee relative to your ankle and hip as you take a step forward. The AR app projects an alignment line from your hip through your knee and to your toes. If your knee drifts inside that line — a frequent issue, particularly in beginner exercisers — the app sends up a flag.
This instant visual correction trains the proper pattern into your nervous system over time. Eventually, your body does it correctly without needing the reminder.
The Lunge Walk Protocol
- Lay your phone sideways on a table or prop it against a wall.
- Begin standing, feet together.
- Take a step forward into a lunge, making sure your front knee does not pass your toes.
- Drive through your front heel to stand up and bring your back foot forward.
- Repeat for 10 steps per leg.
- Let the AR overlay guide your knee position on every single step.
Three sets of that with a minute’s rest between each is a good place to start. As you get stronger, add a resistance band around your knees for an added challenge.
Move 6: AR Push-Up Counter and Form Coach
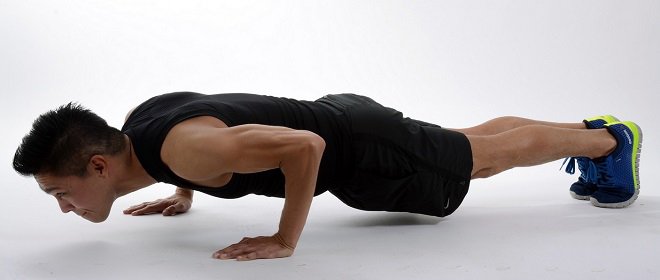
An Upgrade for a Classic Move
The push-up needs no introduction. It’s one of the oldest, most efficient upper-body strength exercises on earth. It targets the chest, shoulders and triceps as well as the core in unison. If done correctly, it is also a comprehensive shoulder health exercise.
But here’s the thing — most people do sloppy push-ups. Hips sagging. Elbows flaring. Neck craning forward. Not only do these bad habits reduce the exercise’s effectiveness, but over time they create strain in all the wrong places.
AR fitness strength moves turn the push-up into something genuinely coaching-quality — without you needing a coach.
What the AR Push-Up Coach Tracks
- Elbow angle: Should be at about 45 degrees from the body, not flared wide
- Hip position: Perfectly straight line from shoulders to heels
- Range of motion: Chest should come close to or touch the ground
- Tempo: How fast you lower versus push back up
- Rep count: Automatically counted and tracked over sessions
Some AR apps give each push-up a quality score — not just whether you did it, but how well. A push-up with good form counts for more than a sloppy half-rep. This gamification aspect encourages you to do them correctly.
Progressive AR Push-Up Plan
| Week | Type | Reps | Sets |
|---|---|---|---|
| 1 | Incline (hands elevated) | 8 | 3 |
| 2 | Standard | 8–10 | 3 |
| 3 | Standard | 12 | 3 |
| 4 | Slow tempo (3 seconds down) | 8 | 4 |
| 5+ | Archer or single-arm progression | 5–6 per side | 3 |
Utilize your AR app to ensure that you maintain form quality at each level of this progression.
Move 7: AR Full-Body Circuit Challenge
Combine It All for the Best Strength Gains
The last of our AR fitness strength moves is not actually just one — it’s an entire body-burning set of AR exercises in a circuit, combining multiple moves into one flowing workout. This is where AR truly shines.
AR circuit apps can walk you through a series of exercises, monitor your form on each, automatically count your reps, adjust rest times based on heart rate or performance, and change the difficulty level as you go.
A Sample AR Full-Body Strength Circuit
Round 1 — Lower Body
- AR-Guided Squats — 12 reps
- AR Lunge Walk — 10 steps per side
- Glute Bridge with hip alignment tracking — 15 reps
Round 2 — Upper Body
- AR Push-Ups with form scoring — 10 reps
- Resistance Band Press — 12 reps
- Plank Hold with AR spine feedback — 40 seconds
Round 3 — Full Body
- AR Deadlift (bodyweight or light load) — 10 reps
- Jump squat with landing mechanics overlay — 8 reps
- Mountain climbers with pace tracking — 30 seconds
Rest 90 seconds between rounds. For best results, complete the full circuit two to three times a week.
Why Circuits Work Better With AR
Circuits are no better than a set of exercises you hope you’re doing right — without AR. With AR, every single movement in each round is monitored live. You’re basically being coached through 20 to 30 minutes of solid strength work — all on your own, at home, at no cost beyond a smartphone app.
How to Build a Weekly Strength Plan Using AR Moves
Here is a simple weekly schedule using all seven AR fitness strength moves together:
| Day | Focus | AR Moves to Use |
|---|---|---|
| Monday | Lower Body | Squat, Lunge Walk, Deadlift |
| Tuesday | Rest or Light Walk | — |
| Wednesday | Upper Body | Push-Up, Resistance Band Press, Plank |
| Thursday | Active Recovery | Stretching with AR posture check |
| Friday | Full Body Circuit | All 7 moves in circuit format |
| Saturday | Optional Add-On | Any 2–3 moves you want to repeat |
| Sunday | Rest | — |
Follow this format for four weeks and you will see real changes — not only in how your body looks, but also in how you move, how you feel and how strong you’re getting.
Getting the Most Out of Your AR Strength Sessions
Here are some easy tips to ensure you get maximum benefit from every AR fitness session:
Lighting matters. AR body tracking works best in good ambient light. Sunlight or a bright room helps your phone camera read your body position correctly. Don’t work out in dark corners or backlit by a window.
Camera angle is everything. Each movement has an ideal camera spot — side view for deadlifts and lunges, front view for squats and push-ups. Spend 30 seconds correctly setting this up before each session. It makes a great difference in the quality of feedback.
Do not rush the feedback. When the AR app flags a form issue, stop and correct it before proceeding. The entire point is real-time improvement. Rushing through corrections is pointless.
Track your sessions over time. Most AR fitness apps keep a record of your workout history. According to Healthline’s guide on tracking fitness progress, reviewing your progress regularly is one of the most effective ways to stay consistent and improve. Look back weekly and see consistently where your form breaks down and what patterns to work on.
FAQs About AR Fitness Strength Moves
Q: Do I need special equipment for AR fitness strength moves? Most of these moves require no special equipment. The primary tool is a smartphone with a good camera. Some exercises optionally add resistance bands or light weights, but bodyweight versions work well for beginners and intermediates.
Q: Which AR fitness apps are best for strength training? The ones with the best reputations include Kaia Health, Future, Freeletics and Nike Training Club. There are different levels of AR integration among them. Try a few free versions to find which interface feels most natural to you.
Q: Are AR fitness strength moves a good alternative to a gym membership? For most people, yes — particularly for basic strength work. You can develop substantial strength without a gym with AR-guided bodyweight and resistance band training. You may need a gym or home equipment as you progress into heavier barbell work, but AR can still support your form training all the while.
Q: When will I see results from AR strength training? Most people see better form and body awareness in the first week or two. After four to eight weeks of consistent training, two or three times each week, visible strength gains typically appear. The accuracy of AR-guided form also means that you may see results sooner than with unguided training.
Q: Is AR strength training safe for teenagers? Yes. AR-guided workouts are typically safe for teenagers using bodyweight or light resistance. The form feedback feature even makes AR training safer than unsupervised gym use, because it corrects unsafe movement patterns before they become ingrained habits. Parents should review app details before downloading.
Q: What if the AR tracking seems inaccurate? Tracking precision is dependent on lighting conditions, camera quality and positioning. If results seem off, try better lighting, shift the position of your phone and make sure your full body is visible within the frame. Most modern mid-range smartphones handle AR body tracking well.
Q: Can I do AR fitness strength moves if I have an injury? You should check with a doctor or physical therapist before beginning any exercise program after an injury. That said, AR form feedback can actually be a useful tool during rehabilitation — helping you perform prescribed movements correctly and safely. There are also dedicated AR rehab apps that serve this purpose.
The Bottom Line — Strength Training’s New Best Friend
AR fitness strength moves are not a gimmick. They are a genuine evolution in the way people can train — smarter, safer and with more feedback than most folks ever receive in a traditional gym environment.
The seven moves featured in this guide hit every major muscle group and every major pattern of human movement — push, pull, hinge, squat, carry, brace and rotation. Combined, they offer a comprehensive foundation for strength.
And the nice thing about doing all this through AR is that you don’t need to already know what you’re doing. The technology meets you where you are, corrects you as you go and helps you build real, lasting strength without the guesswork.
Pick one move. Try it today. Let the technology do its thing.
Your best self does not exist in a distant tomorrow. It is one well-tracked rep away.